Showing posts with label crafts. Show all posts

10.21.2016

Fun Friday: Build and Bond Doll Houses and Crafts

Third Friday of the month: Toys  / Hobbies

If there's one thing I have in common with the girl when I was her age, it's arts and crafts. I think I picked up the hobby from my mother who is very skilled in this department, which includes sewing as well. When I was younger, I didn't get to buy dresses and accessories for my Barbie doll so I ended up sewing ponchos and skirts, fashion accessories, and creating furniture out of match boxes, buttons and scraps. M is into these stuff right now and when my friend showed me a Mishka Build and Bond toy, I knew she'll love this and it will be a good activity for both of us.

M has been into micro crafts and toys since last year, and I featured some of her creations here. She's been stitching and sewing more often lately to create clothes and accessories for her LPS toys. When I saw these "doll houses" from Mishka Build and Bond, I wanted them for myself too, heehee... nakaka-aliw and I thought to surprise her with this. It's awesome! This Sakura Sushi Shop was sent as a gift and it was so cool even J wanted to join and start building with us. We should have started with a smaller kit first coz we found this too daunting with all the materials and steps, hahahaha! This remains an unfinished project.


I ordered several smaller sets as gifts and an extra for us to build. This will take days, or weeks to finish.  Which also means more gadget-free days with the kid!


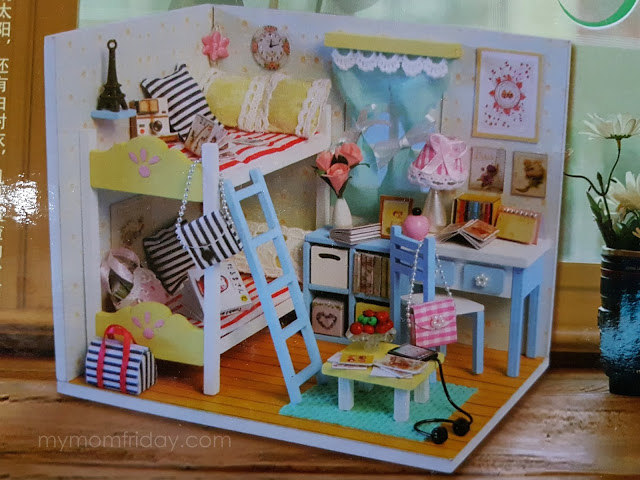
This bedroom with a bunk beds is our current project and we are in the middle of building it. So kahit hindi pa tapos, I wanted to show it na and couldn't wait 'til my Mom-Finds feature to share this with you so you can also order for your family or get them as gifts. The top photo is the expected outcome of our toy bedroom. 

Actually, ang main purpose talaga ni M is to use this as a room for her LPS toys! =) We've been having petty quarrels over this coz with some pieces she doesn't want to try to measure and cut. Anyway, here's the kit complete with all the materials, and even the glue and wires for the bedroom light!


Some bigger sets like the Sushi shop includes scissors, but this one doesn't.
For this set, we needed:
Cutter, scissors
No-nail adhesive for wood and boards
(coz the white glue included is only good for sealing wall paper and lighter materials)
Glue gun/glue
Plastic knife or old plastic cards - use to spread glue evenly
Ruler or tape measure
Needle and thread
Tray (act as work surface to keep tiny materials from getting lost)


Two nights palang kami and we've only set up the walls and floor, plus the main furniture. The manual shows all the materials included, and illustrated instruction for each part of the house. No english translation but the item code and photos are enough to show you the step-by-step procedure. It's very meticulously designed kaya you need time to concentrate! Meron din room designs for boys. 

Kailangan kong mag-salamin sa liit ng ibang pictures that needed to be cut. This is ideal for 10 years old and above, but even smaller kids can do this with parents' help, especially when using the cutter and adhesive. A light and steady hand would be an advantage to piece them all together without damaging the pieces, hehehe. We'll continue building over the weekend. Nakakatuwa, I can't wait for this to be completed!

You can order from: Instagram.com/mishkabuildandbond.


(To be updated once we complete the room.)

I'd love to know your thoughts on this post.  If you enjoyed this, feel free to share it!
Get instant updates:
My Mom-Friday on Facebook
Follow @mymomfriday on Twitter, Instagram and Snapchat
Also on Google Friend Connect, or Subscribe Via Email.
I try my best to reply and answer any questions you may have on each entry so check back if you've left one. Thank you and do visit again!
(Comments with links will automatically be flagged by Disqus.)
read more

1.15.2016

Fun Friday: Micro Toys and Crafts for LPS

Third Friday of the month: Recreation / Hobby / Toys

Do you know what's LPS? At first, I was clueless, until I realized those were "Littlest Pet Shop" toys that my girl is so addicted to lately. I told her it's an old toy already. She said it's new and she watches it on YouTube too. It made a comeback pala and has released many series of toy collections aside from the cartoon show.  So, for the past several months, these tiny "pets" have been her playmates, which also made their way in our bathroom and invaded the bedroom.


read more

4.17.2015

Fun Friday: Batik Dyeing Workshop

Third Friday of the month:  Events / Crafts and Recreation

Paisley is one of my favorite prints. It's swirls and intricate details make it more alluring and kinda exotic. This is the print I wanted for my first batik dyeing project. I was actually not supposed to be at the event due to conflict of schedule, but unexpectedly, it freed up and I immediately asked if there was still a slot left for me 'coz I really wanted to attend. To quote Paulo Coelho, "and when you want something, all the universe conspires in helping you to achieve it." So, I made it, and I even won the contest! Meant to be? I believe so!


read more

8.26.2014

How to Make Oreo Bento Meals

Making bento for the first time was tedious, but fun. I can't think of any other word to describe how our Better Me session went yesterday -- it's just pure fun! My girl would agree with me too. The bonding activity was something different, creative, exciting, and pretty edible! =)  I'm too eager to share with you how we crafted our first #OreoBento meals, so here's a simple tutorial with tips and tricks I picked up from the workshop.


read more

5.23.2014

High on Rainbow Loom Bracelets, Monster Tail, Etc.

Freestyle Friday:  Rainbow Loom  / Accessories / Hobby

My girl and I are still riding the Rainbow Loom wave and are both discovering new designs together. So far, our favorites are Flexafish, Saturn Link Chain, Triple Link, and classic Fishtail. We get help from my niece who's really good at this and have memorized several designs already.  She's been able to teach me and my girl since we started our looming hobby.


As I recall, it was around November last year when we first saw a Rainbow Loom kit from my niece and her mom (my sis-in-law). Eventually, my girl got influenced and wished for her own kit. So, they gave her one for her birthday last January.

We didn't really pick up the hobby immediately - the girl and I just tried making two Fishtail bracelets and stopped there.  It took about two months before we seriously searched for designs on YouTube and after we saw pretty new creations by my niece week after week! Then, I spotted a pack of this cool Rainbow Loom camouflage bands which got me started.  I've been posting some of our bracelets on Instagram ever since (click on square photos to view).

Here's my first set of basic chain link.


After a few simple loom bracelets, I got challenged to create this cuff that my niece taught me. Since then, I was hooked!  I think this is a Sailors Pinstripe design by Justin's Toys videos.


As we progressed, the girl wanted me to browse through more designs, and below, you'll see what we (I) have been making over the past few months. 

Fishtail, Starburst, Dragon Scale cuff

We don't have a complete set of colored bands. I just buy the colors we like, but I don't buy "fake" loom bands. I tried a few from party giveaways but discovered the bands don't stretch well - you can really compare. The bands are also not even, and breaks easily.

Anyway, since summer began, we were able to make one or two each week as we indulged in this new hobby.  Even the boy got in on the action! These two below are his. I made them both. =)


We're currently fond of using glitter and metallic bands... I even got some inquiries about the shiny bands and designs after posting our creations on Instragram!  Next time, we'll get new metallic colors.


The boy's first attempt at Rainbow Loom, and this is what he made - an advanced Mother's Day gift daw for me. Sweet!

My silver Saturn Link Chain; glitter blue and metallic gold Fishtail by the boy

She likes to be colorful and pile them on.

So, the girl left the plastic hook on the bed and I accidentally sat on it. Putol ang hook! It was time for an upgrade - bought two metal hooks and the new Monster Tail, which was just released a couple weeks ago.  The Monster Tail Rainbow Loom kit includes bigger C clips, a set of hook and mini loom, and allows for more elaborate patterns to move down the middle with ease.


This was our first big flower. She wanted metallic gold for her Hibiscus bracelet, and even used it as a ponytail the other day.


We're not fond of charms or making characters, but this was the only request she begged for - a guinea pig/hamster!

Looming is actually very therapeutic for me, even if it's a back-breaking activity! The girl also asks for my help when some steps become challenging.  She's making this new spiral design.


Our favorite tutorials are from Justin's Toys and Rainbow Loom on YouTube.

Spiral Wrap Fishtail Bracelet video


My top favorite design by far, thanks to my friend who showed me hers, is this tight, solid, and flat bracelet.  It's perfect for adults, and guys will love this too.  I knew I have to make one! Here's the Flexafish - can be made using the standard or Monster Tail kit.  I used the Monster Tail for the first time with this design.


That's it for now...I'm going back to making a new Flexafish as requested by the boy.
Have you been bitten by the Rainbow Loom bug?  What's your favorite design/s?


I'd love to know your thoughts on this post.  If you enjoyed this, feel free to share it!
Get instant updates:
My Mom-Friday on Facebook
Follow @mymomfriday on Twitter and Instagram
Also on Google Friend Connect, or Subscribe Via Email.
I try my best to reply and answer any questions you may have on each entry so check back if you've left one. Thank you and do visit again!
(Comments with links will automatically be flagged by Disqus.)
read more

5.07.2014

From Monggo to Captain America with #SigeSabado Playbox

We're in the middle of summer and I am running out of activities to keep the kids occupied. If we don't do something, I'll lose to the iPad! The boy has drum classes twice weekly but the girl... well, we all decided not to enroll her at any summer program this year. She agreed to guitar lessons when she turns 8, which is next year.  I did prepare a calendar for them this summer, and so far, it's going pretty well.  But there are days when they just don't want to follow what we've planned for the day.  Two weeks ago, this big playbox arrived from Breeze - it was heaven-sent! 


read more

4.07.2014

A Different Kind of Summer Program for Kids and Teens

Every summer, parents try to find creative ways to entertain kids, and provide activities that they will enjoy and learn from.  In my case, it's more on arts and music this year. Recently. I discovered these programs which I found unique and enriching for little and big kids, though I won't be able to enroll my kids anymore due to conflict in schedules.  These are not you typical classes so I hope you'll find them interesting and consider for your children this summer break.


read more

12.21.2012

Fun Friday: Easy Gift Wrapping Ideas

I know this post is a bit late already since Christmas is just a few days away and I'm sure most of you have wrapped your presents already, if not gave them away.  Still, I am sharing this with you because we all wrap gifts the whole year round and hopefully, you haven't done some of these yet! =)

Gift-wrapping is one of the more relaxing and fun things to do, for me at least.  Even wrapping books in plastic is quite therapeutic!  I know I'm not alone in that department.

Anyway, when it comes to gifts, if I don't have the store wrap them for me, I use whatever appropriate materials available at home.  I always have assorted wrappers and paper gift bags in stock but sometimes, I don't have that perfect cut or size to wrap a present.

This post will be all about simple and easy-to-do, no-frills wrapping.  There are so many fantastic and over-the-top creations out there, but time is not something I have a lot of during the holidays.  Crafty projects can be tedious, therefore time-consuming.  With too many Christmas gifts to wrap (and I am the only one who does them), I just try to make things simple yet still very presentable.  This year, I think I wrapped almost 100 items in just a few days, over a period of 2 weeks!


The Gift Bag
Here's another way of tying a ribbon on your gift bag - vertically, passing through the handle and over to one side. Some friends who saw this on Instagram liked the idea so I thought I'd share it on the blog... sorry I did not get to do this blog post sooner!

I had two items that would have been perfect when boxed, then wrapped.  But I had none at that time.  Next best thing was to use this last piece of plain kraft paper bag I had.  After rummaging through my box of left over ribbons, this happened.  A wider ribbon would look better though.

This style is universal and can work with all kinds of gifts.  Whether for a small or large bag, just use different types of ribbons to match the occasion and recipient.  When the ribbon is too short, I just tie it around one side of the handles.


The Candy Roll

Sometimes, boxes can be boring when used for wrapping soft items, like clothes, towels, etc.  If the occasion is not formal, I just roll the gift and tie each end to look like candy.

This technique works best with thinner paper or cloth-like materials.  Even old scarves and handkerchief would be perfect for this type of wrapping!  Cylindrical items can also be wrapped this way, as long as it's not breakable.

You can use craft scissors, zigzag or scallop, to trim the edge of the paper for a more decorative look.  Just make sure the ends are a bit longer that the diameter of the the roll so you can tie it securely with a ribbon.  I once tied a criss-cross over and under the roll, from top to bottom, using yarn.


The Bottle Neck
For irregular shaped items, like bottles and tubes, this is how I quickly wrap them.  The top end should be extended long enough to conceal the item, unless you want the tip of a bottle to show.

Roll and secure the bottom with tape, then tie the neck with a ribbon. Also ideal for round or cylindrical items like vases, jars, and candles .  Add an extra touch with a flower clip or big bow, or make ribbons long and curly.


The Band
This is one of my favorite wrapping ideas.  It's a clean and simple look that makes use of excess wrappers.  You can use colorful printed paper as a band or sleeve around gifts.  Best used with plain wrapping paper for a contrasting effect.  Print on print can work well too if you can find complimentary prints and colors.

The paper band is a great alternative to bows and ribbons, cheaper too.  Sometimes, I intentionally use whole printed wrappers and cut them to strips, and highlight their design against a plain background, like this kraft paper.  I even used felt paper and cartolina before.  Put a band on any form of gifts - from boxed to candy roll, and even around a gift bag above, instead of a ribbon!

Do you have other creative, no-frills wrapping ideas?
Hope you have fun gift-wrapping!  Happy holidays!

I'd love to know your thoughts on this post.  If you enjoyed this, feel free to share it! Get instant updates:
My Mom-Friday on Facebook
Follow @mymomfriday on Twitter
Also on Google Friend Connect, or Subscribe Via Email.
I try my best to reply and answer any questions you may have on each entry so check back if you've left one. Thank you and do visit again!
(Comments with links will automatically be flagged by Disqus.)
read more

5.08.2011

Thoughts on Mother's Day

Of all days, I couldn't find the words to express myself this Mother's Day.  I have so much in my mind right now and I thought I'd share some quotes that share my sentiments on this special day for moms.
It is often difficult, tiresome and hard to be a mother, and there is never a rest from being a mother, but helping my children grow to be competent, caring, sensitive, successful, and happy individuals is the most important thing I could ever do, and it is, by far, the most loving and rewarding. - Susan Polis Schutz
My girl wore her favorite pajama set for me

The love between a mother and her child is a bond of the strongest kind. It is a love of the present, interwoven with memories of the past and dreams of the future.  It is an unconditional, forever kind of love. - Barbara Cage
My boy made this paper flower for me to put on my hair :)
The moment a child is born, the mother is also born. She never existed before. The woman existed, but the mother, never. A mother is something absolutely new. - Rajneesh
Creativity in the age of technology -- a cake for mom from the iPad
Creativity in the most basic form -- a cut-out heart and a 'mom & me' sketch from my girl


'Mother', my original poem for Mother's day.

HAPPY MOTHER'S DAY!

I am also celebrating my blog anniversary so if you haven't joined yet, you still have a chance at winning cool prizes on the succeeding weekly draws!!!  Join here. (Concluded)


Quotes from Schutz and Cage:  From the book The Language of Parenting

Thank you for dropping by.
If you enjoyed this post, feel free to share it! Get instant updates and Follow me on Google friends, Facebook and Twitter, or Subscribe here via email!
read more

6.18.2010

Fun Friday: Colorful Kiddie Crafts

Third Friday of the month:  Recreation and Hobbies 


It's back to school for the kids this week and allocating time for hobbies and recreation is still a must to keep them sane -- and mommies too!  So for this post and the next, I'll be sharing a few interesting stuff to busy their little hands.


Between doing homework, projects and simple chores, most young children enjoy watercolor painting, drawing and arts and crafts, aside from a few hours of TV time.  I know I did (way back when)!  This also holds true for my little man who has fancied these colorful pipe cleaners and pompom balls that I bought months ago at his school's art fair.  On a separate occasion, I also bought some wooden laundry clips for them to toy with.

These art materials are far from being fancy, and are really quite unassuming you would not even think of buying them since they are pretty common items you'll see in art class. Sold in super affordable bundle packs and pail kits at bookstores, these colorful balls and bendable furry wires allow kids to get really creative while enhancing their fine motor skills.

Creating his 'sea monster'

Stick on some crazy wiggly eyes and the kids can bring their imaginary characters to life! And did I mention you can leave them alone* bending, twirling and twisting away while mommy does some chores and spend a nice, quiet 'alone' time too? Now that's hitting two birds with one pompom ball!  Of course, this can very well serve as a bonding activity that the whole family can enjoy.


Just a thought -- have the kids surprise dad with his furry look-alike for Father's Day on Sunday!

I thought this looked so much like the DJ in the show 'Yo Gabba Gabba'

Have a happy, crafty weekend!!!


Note:
Use hot glue (with glue gun) to paste parts together. Only adults should handle the glue gun.

Not advisable for kids below 3 years old.
Choking and fire hazard.
Exposed wire tips may scratch or poke fingers.

* Unsupervised, but not out of sight. Keep them within view as they play.
read more